5 DIY Projects to Unlock Your Inner Artist This Summer
DIY is a fun, time-killing, and rewarding thing to do! That feeling of pride when you look at something in your house and say, "Yup, I made that," beats nothing else! Not only that, but these skills can also help you in the future in one form or another.
Though it can be tough, pondering at your workspace, thinking, What should I make today? I will give you some unique DIY ideas made to boost your creative mind and kill that art block!
The ideas I'm listing are very broad, with many ways to interpret, which forces you to use your little peanut brain for creative purposes! Let's begin. 👀✨
1. DIY a miniature version of your room.
This is such a cool way to think innovatively and make use of what you have — using clay for the furniture or making origami. It's a slow and detailed project, but it sure is a time-killer! Popsicle sticks for bedframes and pieces of foam for mattresses are such good ideas.

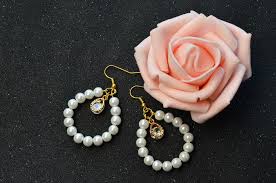
2. Make earrings
There are so many ways to make earrings — it's quite a broad topic. You'll need to get earring hooks, that's the only thing you'll need, and the rest... it's endless! You can crochet flowers and tie a knot to the hook to make flower earrings, or my personal favorite: using copper wire and beads to make different shapes and designs. You can even use clay! If you go on YouTube, there are endless tutorials for these.
3. Craft a clay bakery.
All you need is some air-dry clay and a heart for design. A stall for them is a recommended but personal choice. Millions of inspirational pictures on Pinterest — I made one as well, and it was beautiful. Acrylic paints are a good option! Try to make an interesting texture using things from around your home or proper tools.

4. Embroider a flower garden

5. Make a friendship bracelet with yarn!
There are so many variants to this, and types of stitches from easy to hard! Most tutorials don't show how to start it, so here's how:
-
Evenly line up your army of yarns, end to end, meeting — depending on the tutorial — how many you need. Longer is better than shorter; yarn shrinks as you knot it.
-
Tie a simple overhand knot on top and pin it down with a piece of tape or a clipboard.

I hope you enjoyed these ideas, and if you tried them — had a blast! Feel free to check out my other posts, and goodbye.

Comments
Post a Comment